
Table of Contents
How to build a polytunnel
We decided early on in our allotment life journey that a polytunnel, along with a shed, was a must-have. So, I spent many an hour on YouTube watching videos researching the best way to build a Polytunnel. We decide on a Tunnel that was 2/3 plastic and 1/3 netting to allow natural ventilation. Since we were planning on building a greenhouse we knew we’d have somewhere with higher temperatures, so the netted option seemed best. So in this post, we’ll share how we built ours.
Polytunnels are a type of plastic tunnel that is commonly used by gardeners in the United Kingdom to extend the growing season and protect plants from bad weather. Polytunnels come in a variety of sizes and shapes, and they can be made from different types of plastic. The most common type of polytunnel is the “hoop” type, which consists of a series of metal or plastic hoops that support a sheet of plastic.
Benefits of a polytunnel
Polytunnels offer a variety of benefits to gardeners. They protect plants from the wind, rain, and frost, which can damage or kill plants. Polytunnels can also be used to extend the growing season. They allow gardeners to grow plants that would normally not be able to grow in their region. This can be especially beneficial in colder climates, where the growing season is shorter. Polytunnels also trap heat inside the tunnel, which can help to keep plants warm in cold weather. As a result, polytunnels are an essential tool for many allotment gardeners.
How we Built our Polytunnel
Choose the Right Site
You need to choose the right site for your polytunnel. If you live in a cold climate, then you’ll need to build a structure with insulation. In warmer climates, you might consider using a hoop house instead. Either option will require some planning and research before the building begins.
Prepare The Ground
Before starting construction, make sure you prepare the ground properly. This includes clearing out any weeds, removing rocks, and levelling the area. Make sure there’s enough space between plants so water can drain away.
Base/Timber Frame
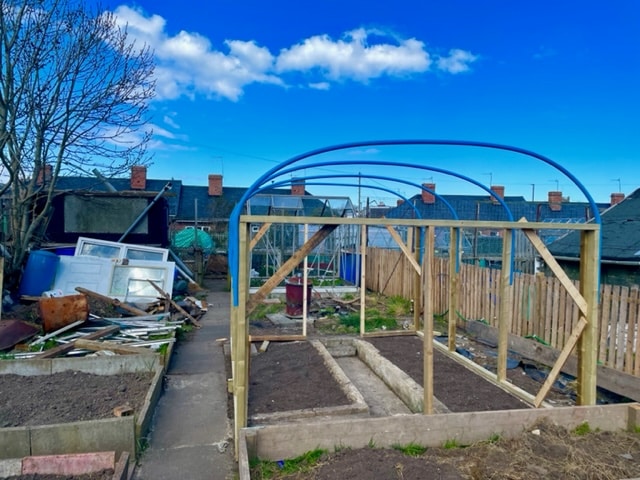
We were fortunate that we already had a solid concrete base to build our polytunnel on (An old greenhouse base). Using tanalised 3×2 timber be made a four-sided frame, leaving a gap for the door at one end. The frame becomes self-supporting the more elevations you complete but I would recommend adding some diagonal braces to aid stability.
Tubing
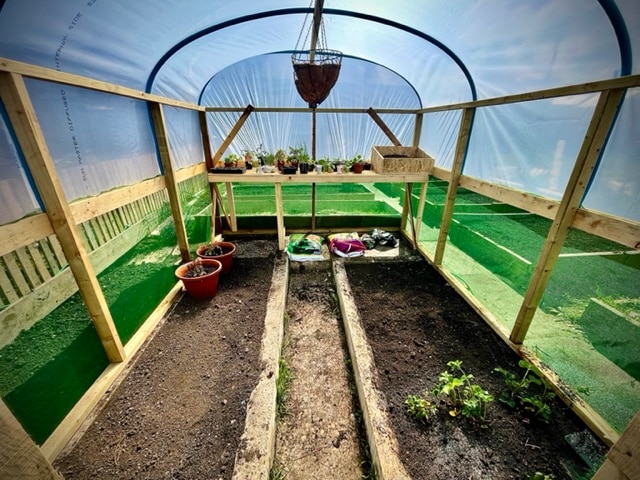
Here in the UK, our mains water comes through blue Alkathene Pipe and with my day job working on a building site, I had the chance to collect offcuts from around the site. But, you can buy this product from places like Screwfix and Toolstation. The pipe is stored coiled up which makes it perfect for forming the curved shape that all polytunnels have. Once we worked out the length of the loop we required, we cut the first one and repeated for the number of supports needed. Fixing these was easy, just predrill the end and screw it directly into the timber frame. We ran a 3×2 timber from front to back of the polytunnel at the highest point to help with stability (ended up being a great place to grow hanging baskets)
Netting
We used some scaffold debris netting from Amazon and stretched it all the way around the base, stapling as we went. We made sure the net was kept nice and tight.
Poly sheet
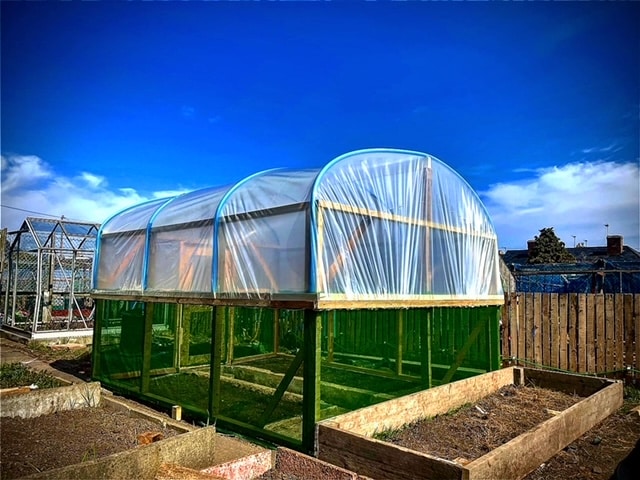
The plastic sheet is from a company in Sunderland called AE Taylor (They deliver too). Firstly, we flopped it over the tunnel, securing it along one of the long sides by sandwiching it between two lengths of 2×1 timbers. Then we screwed it to the timber frame. Repeat this on the other side but make sure you pull the sheet very tight before you it fixes in place. The trickiest part was the ends. This is definitely a two-person job. We watched lots of YouTube videos showing how to do this. Basically, you need to pull it tight but bring it together like a fan to get over the curved shape of the roof.
How To Build a polytunnel: Conclusion
If you are thinking of building a polytunnel, I hope the information in this post has helped. I’ll leave you with a few final thoughts. Polytunnels are definitely worth the investment. They can extend your growing season and give you a head start on the spring planting. They also make it possible to grow crops all year round, which is great for people who live in colder climates. Building your own polytunnel is definitely doable, but it does take some effort. Before you start construction, plan everything out and be prepared for a bit of hard work. Let me know how you get on with your build – I would love to hear about your experiences!
Growing your own food is one of the easiest ways to save money while improving your diet. It’s also fun to watch your garden grow and see what new things come up each season.